Lync active two-factor authentication

Hello everyone (and a special hi to Tom if you’re reading this)!

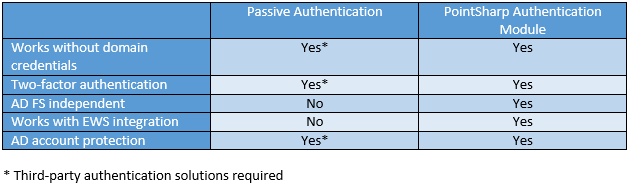
As I mentioned in my post about increasing lync security there is another option to enable two-factor authentication or application specific passwords for Lync, apart from passive authentication. For most of you who attended Lync conference 2014; you have most likely already heard of this option. Why do we need another option? Well, for some organizations this option might be a better fit. There are some limitations to the passive authentication solution that this option does not have; like the below examples.

Passive authentication is site wide
When Lync passive authentication is enabled, it is enabled site wide, more correctly it is set on the Lync web services level (Get-CsWebServiceConfiguration).

Exchange integration is not supported
The integration between Lync and Exchange is lost which in turn means that features are lost in the clients, for instance the meeting calendar.

Client support
Some clients does not support passive authentication such as the Mac client or several conferencing hardware products.

AD FS must be deployed and configured
While this isn’t a problem itself, it is quite a task to add to a Lync deployment if AD FS is not deployed already within the organization.

Enter the PointSharp authentication module. This is a third-party solution that integrates into the Front-End server’s IIS and takes over the authentication of the users. To get a bit more technical this solution protects the Webticket application externally and/or internally by presenting either a custom NTLM authentication or a SOAP based authentication. It uses the Windows APIs to create a Windows identity and then presents a valid user token to the Lync server.
While keeping the Lync sign-in experience intact it provides the option for an application specific password or a true two-factor authentication using tokens.

I was asked to do a demo with Lync and two-factor authentication without using domain passwords and in this case the passive authentication was not an option. There was also a requirement that only external clients have to use two-factor authentication. On top of this they also wanted to make use of the EWS integration. To get all this working I had to get a little creative. Let’s walk through it!

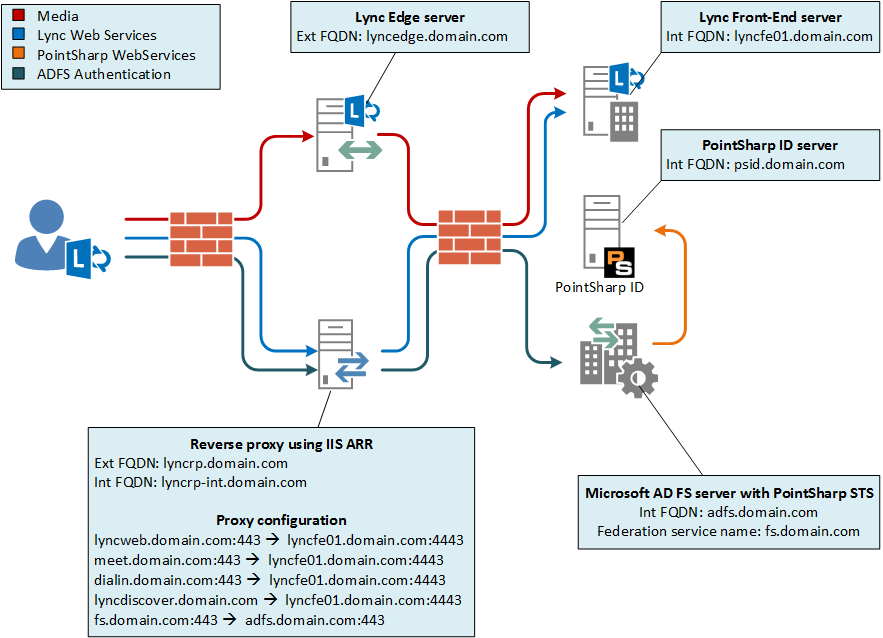
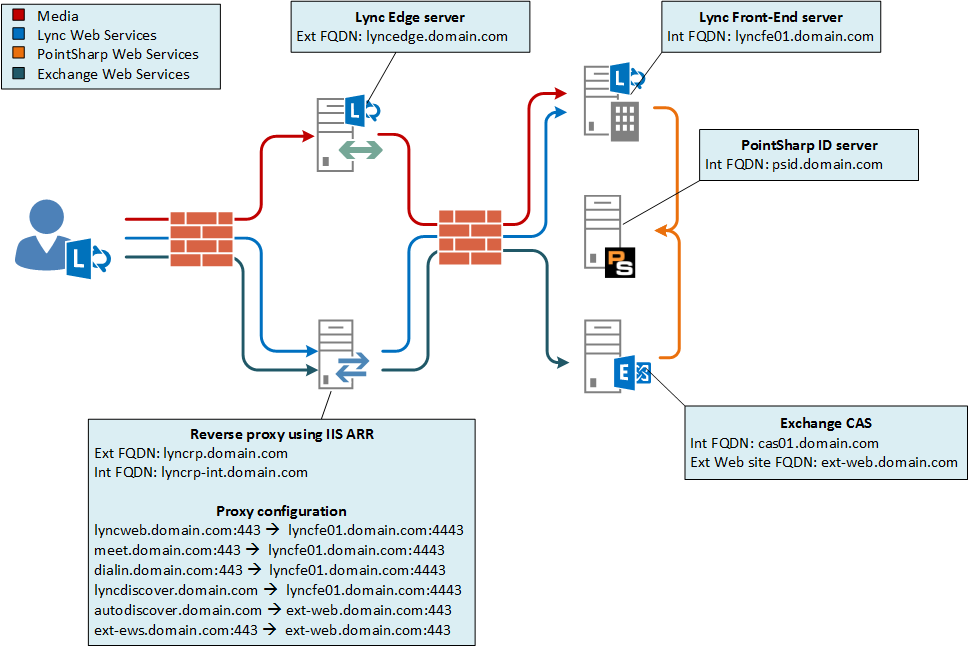
I’ll start with a network overview as I believe that will make my ramblings easier to understand. For those of you who read lync passive authentication with two-factor authentication will recognize the image with some small changes. Specifically that the AD FS server is gone and an Exchange server is added for Exchange web services integration.
2fa_net_overview
First I had to install the authentication module on the Lync Font End server and configure it on the WebTicket web application on the Lync external web site. The configuration is done in the IIS management console and basically consists of pointing out the authentication server, to use NTLM and enable Lync support. Lync part done, on to the exchange integration.

Since the Lync client uses the credentials entered for both the access to Lync, Autodiscover and EWS all three had to accept the authentication being sent by the client (yes, I know there is an exchange credentials option but it isn’t very user friendly). I didn’t want to “disturb” any internal clients so I used the same approach as Lync does and created an external website on one of the CAS servers. I configured the bindings to be host based using a name that isn’t DNS resolvable on the LAN.

I then learned the hard way that creating new virtual directories for the autodiscover and EWS service by default points them to the same location as the original one, meaning that changes made on the external web application is also set on the original one. You don’t want to do this, trust me.

So instead I needed to create new virtual directories, completely separated from the original ones. I first copied some directories.
C:\Program Files\Microsoft\Exchange Server\V15\FrontEnd\HttpProxy\ews -> C:\Program Files\Microsoft\Exchange Server\V15\FrontEnd\HttpProxy\ext-ews
C:\Program Files\Microsoft\Exchange Server\V15\FrontEnd\HttpProxy\autodiscover -> C:\Program Files\Microsoft\Exchange Server\V15\FrontEnd\HttpProxy\ext-autodiscover

Then I created the virtual directories using the –Path switch.
New-WebServicesVirtualDirectory –Server cas01.domain.com –Path “C:\Program Files\Microsoft\Exchange Server\V15\FrontEnd\HttpProxy\ext-ews” –ExternalUrl “https://ext-ews.domain.com/EWS/Exchange.asmx”

New-AutodiscoverVirtualDirectory –Server cas01.domain.com –Path “C:\Program Files\Microsoft\Exchange Server\V15\FrontEnd\HttpProxy\ext-autodiscover”

Then I installed the authentication module and used the same configuration both virtual directories as I did on the Lync server, except that I didn’t enable the Lync features.

When this was done I had to configure the ARR to handle requests for the EWS and autodiscover and proxy these request to this newly created external web site on the CAS. First and foremost I had to add ext-web.domain.com to the host file of the ARR and point it to the IP-address of cas01.domain.com.
Then I created two new server farms, one for autodiscover and one for the EWS.

autodiscover.domain.com -> ext-web.domain.com
ext-ews.domain.com -> ext-web.domain.com

I also needed the ARR to rewrite the host header to match the configured binding. This is done in the URL rewrite module.
First I had to add a server variable named HTTP_HOST. Then I edited the autodiscover rule to rewrite the header like in the image below.
host_header_rewrite
After this I did the same host rewrite change to the EWS rule and I was all set! The demo went perfect and everyone who does demos knows how good it feels when everything is spot on.

Phew! long post, I guess i need one of these.
TL;DR I configured stuff, made Lync authentication more secure, demo went perfect.

For those of you who actually read all of it; thanks for your time, I hope you enjoyed it!

Lync Passive Authentication with two-factor authentication – Part II

* Updated 2014-04-17
Added two-factor authentication explanation and updated the image showing the mobile sign in experience. Thanks to Shawn Harry (@shawnharry on twitter, you want to follow him) for pointing this out

Welcome back to part II in this series about “Lync Passive Authentication with two-factor authentication”. In part I we looked at the configuration of passive authentication both on the Lync server and on the AD FS side. Today we’ll take a look at how to add two-factor authentication to this.

Lync passive authentication cannot do two-factor authentication by itself. It relies on AD FS to do the actual authentication. In turn AD FS requires a third-party authentication solution to bring two-factor authentication to the table. Let’s set the table!

 First we need to set up a Security Token Service (STS) that can do the authentication and get the correct claims and pass them to the AD FS which in turn will send us to Lync with claims that is trusted by the Lync 2013 server. In this setup I’m using PointSharp Identity Federation which includes an STS which I have installed on the AD FS server. Please note that the actual STS configuration depends on the STS you use but it should be similar for many.

The configuration of this STS is done in the IIS Management console in a “snap-in” on the PointSharpSTS web application.

sts1

There’s a few settings you need to configure for this to work. In this case we need to tell the STS where the authentication server is, which authentication method to use, who the issuer of the claims is, the URI of the issuer, the relying party URL and a signing certificate that the AD FS trusts.

sts2

By looking at the above image and at the network topology image from part I of the series you will know what names should be put where. In my case the STS is installed on the AD FS server itself so the certificate used for signing the claims is the same as the AD FS uses.

We also need to configure the claims the STS should create and pass on to the AD FS. Lync 2013 wants the primarySID claim. In this case we tell the STS to collect the attribute values of userPrincipalName and objectSID from the authenticated user and send the values as claims to the AD FS.

sts3

The next step is to tell the AD FS that the STS is a trusted claims provider. The steps to do this differs a little between different STS’s. You can either use the <code>Add-AdfsClaimsProviderTrust cmdlet<code> in powershell or the AD FS management console. In my case the only thing I had to do was to point out the URL to the STS and give it a name (PointSharp ID in my setup for reference).

When the STS is added it will be listed as a claims provider. We now need to make a claim rule to pass the primarySid claim through. This can be done in the management console but the below example is for powershell.

1. Create a text file on your AD FS server using your favorite editor and paste the lines below into it.
@RuleTemplate = "PassThroughClaims"
@RuleName = "Pass through primary SID"
c:[Type == "http://schemas.microsoft.com/ws/2008/06/identity/claims/primarysid"]
=> issue(claim = c);

2.Save the file as C:\ClaimsProviderRules.txt.
3. Start Windows PowerShell.
4. Attach the claim rule to the claims provider.
Set-AdfsClaimsProviderTrust –TargetName "PointSharp ID" -AcceptanceTransformRulesFile "C:\ClaimsProviderRules.txt"

The final step is to force users who want to use Lync to use the STS that we just configured. This is done by modifying settings on the relying party which is the Lync server.
1. Start PowerShell on the AD FS server
2. Modify Lync relying party (note that “PontSharp ID” is the name of my claims provider in the AD FS console).
Set-AdfsRelyingPartyTrust -Targetname Lync-Ext -ClaimsProviderName @("PointSharp ID")
Set-AdfsRelyingPartyTrust -Targetname Lync-Int -ClaimsProviderName @("PointSharp ID")

The table is now set and this is what it looks like when the dinner is served:

Lync mobile client:
1. Enter SIP-address.
2. Enter username and app-password (not domain password)
3. Enter a valid OTP (One-Time Password)
4. Logged in!
mobile_passive_signin

In the above example a hardware token was used to generate the OTP that provides the second factor in our two-factor authentication. As Shawn mentions in his comment, an SMS could also be used to provide the OTP.

Lync PC-client:
pc_client_signin
The sign in process is the same as on mobile clients, only the graphics differ.

I hope you have enjoyed this series about Lync passive authentication with two-factor authentication”. This part concludes the series but stay tuned for more Lync security.

Lync Passive Authentication with two-factor authentication – Part I

Hello and welcome to this two part series about Lync passive authentication with two-factor authentication. Passive authentication is a feature of Lync server 2013 which, simply put, makes Lync AD FS claims aware. This in turn means that Lync 2013 server can be integrated with Microsoft AD FS for authentication purposes. In this post we will go through the configuration of Lync passive authentication as well as how to configure Microsoft AD FS to require two-factor authentication for Lync 2013.

So why do you want this? Well, you want to get better security for your Lync 2013 environment. For more information read my post about increasing Lync security.

Lync passive authentication requires support in the Lync client to handle the redirect to the AD FS login. This is something that has to be taken into consideration before deploying passive authentication. Refer to the list below for whether a specific client supports passive authentication as of 2014-02-20.

Lync client support for passive authentication

Now that we’ve considered supported clients, let’s get started. To set all of this up you need to have a few things ready. Call it prerequisites before you can complete the rest.

  • A working Lync 2013 standard or enterprise server.
  • A reverse proxy publishing the Lync installation to the internet.
  • Microsoft AD FS installed configured.

In this environment I’m using the IIS Application Request Routing (ARR) as a reverse proxy. If you plan on using the ARR, I recommend this guide: Using IIS ARR as a Reverse Proxy for Lync Server 2013.

This is a simple network overview which I believe will help during the configuration.

lync_adfs_demo

AD FS configuration
We’ll start by preparing the AD FS server by setting up the Lync server as a relying party and apply some rules to it.

1. Log in to adfs.domain.com with an account with AD FS administrative permissions.
2. Start PowerShell.
3. Add relying party trusts.
Add-ADFSRelyingPartyTrust -Name Lync-Int -MetadataURL https://lyncfe01.domain.com/passiveauth/federationmetadata/2007-06/federationmetadata.xml
Add-ADFSRelyingPartyTrust -Name Lync-Ext -MetadataURL https://lyncweb.domain.com/passiveauth/federationmetadata/2007-06/federationmetadata.xml

4. Create authorization and transform rules.
$IAR = '@RuleTemplate = "AllowAllAuthzRule" => issue(Type = "http://schemas.microsoft.com/authorization/claims/permit", Value = "true");'
$ITR = '@RuleTemplate = "PassThroughClaims" @RuleName = "primarySid" c:[Type == "http://schemas.microsoft.com/ws/2008/06/identity/claims/primarysid"]=> issue(claim = c);'

5. Configure relying party trusts
Set-ADFSRelyingPartyTrust -TargetName Lync-Int -IssuanceAuthorizationRules $IAR
Set-ADFSRelyingPartyTrust -TargetName Lync-Int -IssuanceTransformRules $ITR
Set-ADFSRelyingPartyTrust -TargetName Lync-Ext -IssuanceAuthorizationRules $IAR
Set-ADFSRelyingPartyTrust -TargetName Lync-Ext -IssuanceTransformRules $ITR

That’s it, for now, on the AD FS server. We’ll come back to it later in part II.

Lync server 2013 configuration
Now we must configure the Lync to use passive authentication and to trust claims issued by our AD FS server (adfs.domain.com).

1. Log in to lyncfe01.domain.com as a user who is a Lync universal server administrator.
2. Start the Lync Server Management Shell.
3. Create a new Lync WebService Configuration.
New-CsWebServiceConfiguration -Identity webserver:lyncfe01.domain.com -WsFedPassiveMetadataUri https://fs.domain.com/federationmetadata/2007-06/federationmetadata.xml

4. Disable default authentication mechanisms.
Set-CsWebServiceConfiguration -Identity webserver:lyncfe01.domain.com -UseWsFedPassiveAuth $true -UseWindowsAuth none –UseCertificateAuth $true

New-CsProxyConfiguration -Identity registrar:lyncfe01.domain.com -UseKerberosForClientToProxyAuth $false -UseNtlmForClientToProxyAuth $false

5. Change the mobility policy so it suits passive authentication
Set-CsMobilityPolicy -Identity Global -AllowExchangeConnectivity $false

At this point Passive authentication is set up! In part II of the series we’ll configure the two-factor authentication and make it mandatory. Stay tuned for part II.

Increase Lync 2013 security

My posting will have a little Lync sprint at the moments since we’re in the middle of Lync Conf 14. As I mentioned in my previous post, this post will be about securing your Lync 2013 deployment. More specifically it will focus on how to increase security when you publish your Lync to the Internet.

When publishing a default installed Lync deployment to the Internet, clients will authenticate directly to the Lync Front-End server using their domain credentials. While it’s true that the traffic is sent through a reverse proxy the actual authentication takes place at the Lync Front-End server.

This means that for instance you can lock any user’s AD account by just knowing its username, thereby inflicting a Denial-Of-Service, not only for Lync. On the mobile clients you can also choose to save the password in the client which means that a lost or stolen device has the domain credentials stored on the device. It’s also worth to notice that two-factor authentication is not possible without ADFS and a third-party identity provider.

For many, this just isn’t not good enough for a system that is published to the Internet. Looking back at past projects, which have included publishing a system to the internet, there are a two requirements that have been in common for almost all of them.

1)      Domain credentials may not be used.
2)      Two-factor authentication is mandatory for external access.

So, how do we fulfill these two requirements? There are two ways to solve this and both Requires integration from a third party. Both solutions have their advantages.

pa_pam2

Deploying any of these solutions greatly increases the security of your Lync deployment.

My upcoming post will explain how to configure both solutions, starting with “Lync Passive Authentication with two-factor authentication”. Stay tuned for more Lync security!

Lync authentication process

This is my first blog post about Lync, more will come but since most of them probably will be about authentication in one way or another this post seems like a good start.

I started to look into the Lync authentication process after getting a lot of questions from customers who wanted to know if and how they could increase the security of their planned Lync environment. Specifically how to handle mobile clients. However, before we go into how to make the Lync environment more secure we need to understand how authentication works.

Microsoft Lync Server 2013 supports A LOT of different clients, it is clearly one of its strengths. There’s a client for PCs, Macs, smartphone, tablets and IP-phones to name some of them. Depending on the type and version of the client being used you gain access to a different set of features from the plethora of Lync features. There is, however, one thing all these clients have in common. To enjoy the wonderful world of unified communications each and any of these clients have to tell the server who is connecting. Simply put, anyone connecting to a Lync server has to authenticate themselves. This is neither shocking nor surprising in any way but it is a very important part of any system using digital identities.

Diving into the authentication process I quickly realized that the authentication process differs depending on the client and its network location. Digging even deeper (thank you Wireshark), I started looking at the actual requests and responses that takes places during a Lync sign-in. Whatever authentication protocol the client uses there are a few steps that each client does before it reaches to the stage where it actually authenticates to the server.

1. Lync discover
This works similar to the Exchange autodiscover. It is used mainly to figure out if the client is an internal or external client and where to connect.

2. Metadata Exchange (MEX)
When the client knows where to connect it makes a connection the MEX service. The MEX service exposes metadata about the service, essentially it provides information about how the server is configured. It tells a client how and where it should do authentication.

3. Acquire a webticket
What each Lync client want is a webticket. The webticket is used throughout the whole Lync experience. It’s the master ticket, the one ticket to rule them all, the… You get it. To acquire this ticket the client connects to the webticket service which then prompts the user for authentication. This is where it starts to differ between the clients.

Lync 2013 supports many authentication protocols and this post will not discuss all of them but the following list shows the authentication protocol being used by some Lync clients in a default installation.

Client Authentication protocol
PC-client (internal network) Kerberos
PC-client (external network) NTLM
Windows Phone NTLM
iOS NTLM
Android NTLM (Versions prior to 5.4 use SOAP)
Lync Web App (domain user) SOAP
Lync Web App (guest) SOAP (Anonymous)

My next post about Lync will discuss what can be done to increase the security for Lync 2013.