You have probably heard about modern authentication, there’s a lot of talk about it. Especially when it comes to Office 365 and Azure. You might have seen the acronym ADAL which is the Active Directory Authentication Library which is modern authentication. So, what is modern authentication and what does it mean for Skype for Business?
Well, let’s first take a look at what modern authentication is before we start looking at how it works in Skype for Business. While modern authentication is something that is presented as something new and shiny, the corner stones and the foundation is nothing new. Modern authentication simply put, is federation. Which in the Microsoft world means AD FS.
So what does this mean for Skype for Business? Well, to be honest, not very much. It works pretty much the same as the old Passive authentication which was also based on federation. Sadly there’s no EWS integration unless you are using Office365. Hopefully this will change.
The sign in flow differs from the original behavior: An S4B client attempts to connect to the S4B server, gets redirected to AD FS where the client is presented with an authentication form, user authenticates and gets a claim and is then redirected back to the S4B server where the claim is accepted by the S4B server and the client gets the webticket. So what has changed?
From my initial tests I’ve found that they’ve changed the federation protocol to Oauth2 which comes as no surprise as it is being pushed quite heavily. Secondly, ADAL support is built into the client so unlike passive authentication the client doesn’t spawn the browser window the same way (to present the authentication form) so it looks a tad bit different.
The image below is a screenshot of the sign in using modern authentication and the PointSharp MFA to provide two-factor authentication.
If you want to test modern authentication you can follow the steps on TechNet. Just remember that you need an AD FS server as well as the scripts needed to enable Oauth2 for Skype for Business (http://aka.ms/sfbadalscripts)
Hello! Those of you that read my twitter already know that I am going to Microsoft Ignite next week. Those who didn’t know would have known if they followed me on twitter (hint hint). Anyway, I’m going to Ignite with many of my PointSharp colleagues. I’ll be going to sessions, stalking various Skype MVPs and of course be in our booth (#563) and talk about Skype for Business security.
We will also be bringing our brand new version, PointSharp 4.4, to the conference which includes some nice features for Lync/Skype4B.
A new admin UI
Previously we used the IIS Manager to configure our reverse proxy, in this version we have built our own UI which makes administration and deployment much easier.
Device registration for PC
In our previous versions we created a partnership between a user and their mobile device. This ensures that credentials cannot be stolen and used on another device. Now, we are bringing this functionality to the Edge server which means that we can do the same for PCs.
Block clients
We have made it possible to block an active client. For instance if a user’s phone is stolen/lost we can block that specific device. The client becomes useless, it doesn’t even matter if the correct credentials are stored on the mobile device or PC. No more disabling the whole account.
These new features combined with application specific passwords (no need for domain passwords on devices), pre-authentication and even two-factor authentication provides a lot of extra security to Lync/Skype4B. I have to say I’m proud of what our team has has done. More info at PointSharp
Are you coming to Ignite? Come talk to me in our booth, ping me on twitter (@techmikal). I’ll also be at some of the UC oriented parties in the evenings. I hope to meet you there!
This post is going to be about what seems to be one of the least discussed features in Lync. I’m talking about the Lync Kerberos Account… No, don’t you dare close this window. We know it’s there, the Best Practice Analyzer tells us it’s considered ‘best practice’ to enable Kerberos authentication for Web traffic. Let’s keep that in mind while I try to unravel the reasons. To do so, and still make some sense, I have to start by explaining (quite) a bit about Kerberos and how it works. For any of you who are familiar with Exchange probably recognizes the Exchange Alternate Service Account (ASA), this is the Exchange equivalent of the Lync Kerberos Account. This is going to be a long post, and much won’t be specific to Lync, but I believe it’s worth reading and I believe people need to start deploying the Lync Kerberos Account.
Kerberos is complicated and most often you don’t have to care much about it, because it all happens automatically under the hood. While it’s great that it works automatically (most of the time) it shouldn’t be overlooked as it’s very important. It is the preferred authentication protocol for Windows. Most services that you access daily on your LAN are accessible to you because you have authenticated using Kerberos. Lync is no exception, it wants to use Kerberos as much as possible, if you’ll let it.
Today there are three commonly used authentication protocols in Windows. There’s basic authentication which, by itself, offers no security at all, that’s right, no security at all. Then we have NTLM, which was the preferred authentication protocol in pre-Kerberos times. It is still widely used today, because unlike Kerberos authentication, it doesn’t require that the authenticating client has access to a Domain Controller. This is the reason internal Lync clients try to authenticate using Kerberos and external clients fall back to NTLM. Finally, we have Kerberos.
If you aren’t interested in how it works and just want to deploy the Lync Kerberos account there is a TL;DR almost at the end of the post.
Great, you’re still reading. It gets a little complicated but I will do my best to explain it as simply as I can without omitting very important things.
Kerberos
Kerberos is an authentication protocol that is based on tickets that allows users and computers to authenticate in a secure manner over a non-secure network. The tickets that are used to authenticate never contains any passwords which means that a users password is never sent over the network. It uses symmetric key cryptography and requires a 3rd party that is trusted by the entity that is authenticating and the one that requires authentication. This 3rd party is the KDC (Key Distribution Center). In the Microsoft world this is the Domain Controllers. The KDC knows the secret key for all users and all computer accounts. All secret keys are a salted hash of the account password. The KDC is also trusted by all domain members, meaning that it can validate all tickets and any ticket issued by the KCD is trusted by all domain members. This is very important as we go on. As mentioned above Kerberos is based on tickets. There are different types of tickets and they are used for different things. To access a service you need a service ticket, a service ticket proves your identity to a computer that is running a service. To get a service ticket you need a Ticket Granting Ticket (TGT). To get a TGT you must authenticate yourself to the KDC.
In the following example a user wants to access an OWA (It’s a little easier to use as an example than Lync). The whole authentication process starts when the user logs on to the workstation.
The user signs in to the workstation, when they do, the workstation will contact the KDC and request a Ticket Granting Ticket (TGT). The requests consists of a plain text part which includes among other things, the username. A portion of the request is encrypted with the users password. This is called the Authentication Service Request (AS-REQ).
The KDC receives the request and inspects the plain text part where it can see who is this person claiming to be. It then looks up the user and in it’s database where it also finds the users secret key. It uses this secret key to decrypt the encrypted part of the message. If it’s able to decrypt the message it knows that the user is who they claim to be (or at least that the person is using the correct password). Now that the Domain Controller knows who the user is it will go ahead and respond with a TGT. This TGT contains information about the authenticated user and is encrypted with the KDC’s secret key which is not known to the workstation. It stores this TGT in the memory, for the sake of this example let’s call it the Kerberos memory, for as long as it is valid (10 hours by default). The response itself is called the Authentication Service Reply (AS-REP).
Now remember that step 1 and 2 happened when the user logged into their workstation. Now the sequence continues when the user decides to access the OWA. This happens, let’s say, an hour later.
The user tries to access the OWA anonymously. The server responds with a HTTP 401 status code, meaning it requires authentication. In the response there is a header named “WWW-Authenticate” with the value of “Negotiate” which tells the client which type of authentication protocol to use. In this case Kerberos. The workstation looks in its Kerberos memory, where it will notice that it doesn’t have a service ticket for the HTTP service of the machine hosting the OWA. It then contacts the KDC again with a service ticket request. The request states which service the client wants to access. This is specified by including the Service Principal Name (SPN i.e. HTTP/exchange-cas01.contoso.com). The client also attaches the TGT it received in step 2 (from the kerberos memory) to the request. This is called the Ticket Granting Service Request (TGS-REQ).
The KDC receives the TGS-REQ from the client. It reads the SPN in the request and searches it database for a user account, or computer account, with a matching SPN registered. Now that the KDC has verified that the SPN exists, it also knows which account that holds that particular SPN. To determine who the user is, it decrypts the TGT using its own secret key (the same it used to encrypt the ticket in step 2). If it successfully decrypts the ticket, it knows that it was issued by the KDC and therefore the content can be trusted. And the content contains… You’re right, it contains the users verified identity. Now the KDC knows which account that holds the SPN (the Exchange CAS) and the user who wants to access the service. It then responds to the TGS-REQ with a service ticket, which it encrypts with the secret key of the account that holds the SPN. The workstation then receives the service ticket. Note that since the service ticket is encrypted with a secret key unknown to the client, it cannot read the encrypted part of the ticket. The client stores this ticket in the Kerberos memory for as long as it’s valid. The response is called the Ticket Granting Service Reply (TGS-REP).
The workstation now connects to the OWA. It includes the service ticket, taken from the Kerberos memory, and uses it in the “authorization” header of the HTTP request.
The web server hosting OWA receives the request and inspects the authorization header. It extracts the service ticket and attempts to decrypt it using its own secret key. If it can, it means the KDC has encrypted it and it’s content can be trusted. From the ticket it is able to extract the users identity and their group memberships. The request is then authenticated and the user is served the requested contents.
I’ve made a small video that illustrates how the above example works
Important things to remember from the above example.
The server running the service (OWA) never contacted the DC. This means less load for the service and each client doing most of the job.
No password was sent over the network.
When a client has a valid ticket for a service it can be used as long as its valid, meaning no need to go through the authentication process again and again. Each request is authenticated but the client uses the same ticket.
The ticket sent to the service also includes group memberships which means authorization decisions can be made directly without contacting a Domain Controller.
NTLM
Now that we understand how Kerberos works (we do, don’t we?)… Well, at least we know the basics of how it works, which is enough for the scope of this post. Before we can get back to Lync we need to understand one more authentication protocol… I promise, its the last one for this post. We need to look into NTLM which is also used by Lync. Without understanding both protocols we can’t understand the pros and cons.
Unlike Kerberos, NTLM is not built on tickets. NTLM happens in three phases. These phases includes three different types, Type 1-3. So let use the same example as above. A client wants to access an OWA that is protected by NTLM authentication.
The client starts his browser and navigates to the OWA address.
The server responds that it requires NTLM authentication.
The client sends an NTLM Type 1 message that includes its NTLM capabilities.
The server responds with an NTLM Type 2 message that contains a generated challenge.
The client extracts the message from the server and uses it’s password to generate a Type 3 message that is sent to the server.
The server receives the Type 3 message, sends the Type 2 and Type 3 message to the DC.
The DC receives the Type 2 and Type 3 message. Validates the messages towards its database and responds back to the server with whether the user has successfully authenticated or not.
The server receives the responds from the DC and if it’s correctly authenticated it lets the client access the requested resource.
Seems a lot easier than Kerberos, right? Well, it has to do this for each request… Yes, each image, each JavaScript and each file… That’s not very efficient. There is NTLM authentication persistence that is meant to help with the above problem but it would work best with one CAS or only one Front End.
So after reading through the above we can quite safely say that we want to use Kerberos over NTLM where possible.
Load balancing
We’re getting closer now to the point of this post, the Lync Kerberos Account, and one of the reasons it’s considered best practice.
While a client dependant load balancing/fail over perhaps isn’t the most elegant solution, it makes it a lot easier to deploy. This works well for SIP traffic where the authentication is connection based. Meaning that when the connection is established and the user is authenticated the connection is kept open and marked as an authenticated connection. This way the client does not have to provide credentials with each request. There is one protocol which is not covered by DNS load balancing and still needs to be load balanced using a hardware load balancer, namely HTTP which is used for Lync Web Services. Lync Web Services is used quite a lot by the clients, which then risks falling into the NTLM trap mentioned above. Meaning each request has to be authenticated towards the DC. While this certainly works it’s not optimal at all. Why put more load on DC’s and network than necessary? Why use an inferior authentication protocol? There really is NO good reason.
How come it’s not deployed everywhere then? Because it works without deploying it and likely because Kerberos authentication is less well known and a little trickier to load balance. Hopefully it won’t be after reading this post.
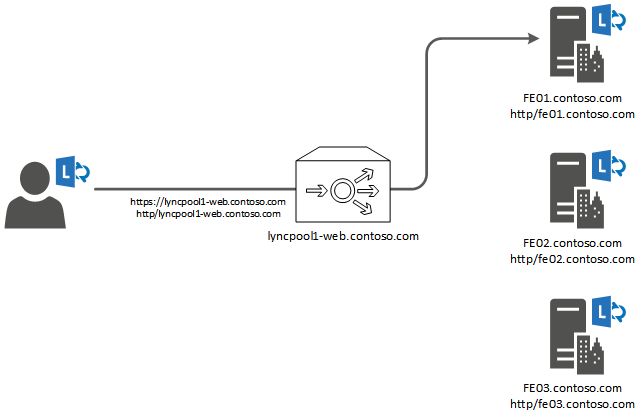
While explaining Kerberos above I mentioned that it relies on SPNs to function properly. This is because tickets are encrypted with the key for the service that is known to the server hosting the service and the DC. In the following scenario we have lyncpool1.contoso.com that consists of three Front Ends (fe01-03.contoso.com). The overridden name lyncpool1-web.contoso.com DNS record points to the load balancer that is in front of all three Front Ends.
The client will connect to https://lyncpool1-web.contoso.com and from that name it will determine that it needs a service ticket for the HTTP/lyncpool1-web.contoso.com to which the DC will likely reply “no such service principal” because no such SPN exists. On some installations I’ve seen that the SPN does exist in one of the following configurations.
Registered to each Front End Servers computer account. This breaks Kerberos. Each SPN must be unique.
Registered to one Front End. This doesn’t break Kerberos but can’t be load balanced. When a client goes to the load balancer with a valid kerberos ticket and gets directed to a Front End that doesn’t have that SPN registered, it will fail. As you can see in the image below the client’s Kerberos ticket is issued to HTTP/lyncpool1-web.contoso.com. The request ends up at FE01 which does not hold that SPN.
So, what to do? Enter the Lync Kerberos Account!
The Lync Kerberos Account
The Lync Kerberos Account is a really smart idea that makes load balancing Kerberos for Lync Web Services a non-issue. Essentially it’s a computer account. When created it’s just that. Now comes the special part; when you assign it to a site the correct SPNs are registered to that account and all Front Ends in the site become aware of the account and can use it for authentication purposes. This means that each server in the pool knows the secret for that account that then can be used to decrypt Kerberos tickets. This also means that whether the client ends up at FE01, 02 or 03 it doesn’t matter because the ticket it sends is encrypted with the service key for HTTP/lyncpool1-web.contoso.com which all of them can decrypt and read because they have the secret key of the Lync Kerberos Account.
TL;DR Kerberos is an authentication protocol based on tickets. It’s better than NTLM. Always deploy the Lync Kerberos Account.
Now that we’re all on the same page (hopefully), how do we deploy this account? It’s quite simple.
First we need to create the account itself. New-CsKerberosAccount -UserAccount "Contoso\KerbAuth" -ContainerDN "CN=Users,DC=contoso,DC=com"
Then we need to assign it to our site. New-CsKerberosAccountAssignment -UserAccount "Contoso\KerbAuth" -Identity "site:Contoso"
Enable the topology Enable-CsTopology
Set the password for the account. Do NOT skip this step. Set-CsKerberosAccountPassword -UserAccount "contoso\KerbAuth"
And that’s it! The account is deployed. You can verify that the correct SPN’s has been added to the account by running. setspn -L KerbAuth
Verify that you can see the overridden internal Web Services SPN in the list (HTTP/lyncpool1-web.contoso.com). Also make sure that the DNS A record for lyncpool1-web.contoso.com is pointing to VIP on your load balancer for internal Lync Web Services.
If you receive client pop ups after you have enabled the Lync Kerberos Account it means you have missed something in the configuration.
You can verify your Lync Kerberos Account configuration by running the following command from the Lync Server Management Shell. Test-CsKerberosAccountAssignment -Identity "site:Contoso" -Report "c:\temp\KerberosReport.htm" -Verbose
I know this has been a long post, hopefully you found it interesting. Thank you for reading.
Twitter and blogs have been buzzing about the update for the Lync mobile client for android. It was released on the 12th of May and demoed on the same day by Modality System’s Justin Morris (@justimorris) at this year’s TechEd NA.
The update includes the following features:
– Tablet support
– Add participants into an ongoing conversation (IM or Lync Meeting)
– Start an ad-hoc group conversation
– Bug fixes
These are great changes to the android client, bringing its functionality closer to its Windows Phone and iOS siblings. You have most likely read this already since it has been all over the Internet. So why am I writing yet another blog post about this? Well, the simple answer is that this update contains more than meets the eye. Specifically there are two changes that I find particularly important.
– Security improvements through tightened SSL validation.
– Authentication protocol changed to NTLM
While these features might not sound as shiny and extravagant as the previous list they are very important from a security perspective.
Any change to strengthen the validation of certificates is a good change. The tightened SSL validation means that the client must be able to validate the certificate and its chain. A valid certificate must therefore meet the following criteria’s:
• Certificates cannot be expired.
• The certificate chain must be validated, and certificates must meet one of the following requirements:
o Certificates must be trusted (that is, signed by a trusted authority).
o Certificates (and chain) have to be installed on the device.
• The DNS Name certificate property has to match the URL.
The second feature much appreciated. I spent the entire TechEd EU 2013 asking presenters and Microsoft employees why the Android client was sending its credentials in clear text (no, Base64 is not encrypted, it’s encoded) while the other mobile clients used NTLM. I never got an answer. But with this update the authentication protocol for the Android client has changed to NTLM which means that no more credentials are being sent in clear text.
This means I must update the table from my first blog post about the Lync authentication process to reflect this.
Client
Authentication protocol
PC-client (internal network)
Kerberos
PC-client (external network)
NTLM
Windows Phone
NTLM
iOS
NTLM
Android
NTLM (Versions prior to 5.4 use SOAP)
Lync Web App (domain user)
SOAP
Lync Web App (guest)
SOAP (Anonymous)
It should be noted that the Android client still doesn’t request a certificate like Windows Phone, iOS and the PC client does. Perhaps in the next update!
As always, thank your for reading. I hope you enjoyed the read.
Hello everyone. Time for another blog post. As you might have noticed, if you have read my other posts, I have been very focused on the security aspects of Lync. Today’s post is not any different in that aspect but it will focus on the standard Lync web service configuration when using any two-factor authentication for Lync.
As you probably know most Lync clients retrieve a certificate upon a successful authentication towards the Lync front-end server. This certificate, like any, has a validity time and by default this is set to 180 days. If we take a step back and analyze that we can clearly see how that doesn’t go well with two-factor authentication. We implement two-factor authentication to raise the security bar and most importantly to be absolutely sure that the user logging in to our Lync really is who he or she claims to be.
A user signs in using two-factor authentication. Then Lync provides the user with a one-factor authentication (the certificate) to be used for upcoming authentication purposes for 180 days. Kind of defeats the purpose to demand one two-factor authentication for 180 days. The tricky part is that upon an authentication the user is first given a webticket (by default valid for 15 minutes for external users and 8 hours for internal users), this webticket is then used as authentication to get the certificate. This certificate can then be used to get a new webticket and yes the webticket can then be used to get a new certificate… See where this is going?
So what can we do? Well first and foremost we can change the validity time of the certificates that Lync creates. The following command shows your current configuration.
This will not stop a client from using either the webticket or the certificate to renew itself, however the time frame is much more limited. This is important because, from my experience, only the PC client is able to keep signed in for a very long time (if kept powered on and never is rebooted). The mobility clients are often in sleep state where this “renewal” does not happen and as such they are prompted for the two-factor again.
I’ve met quite some Lync customers that has a policy that state that the Lync PC client has to connect over VPN to get Lync access. Quite a nice policy.
Hello everyone (and a special hi to Tom if you’re reading this)!
As I mentioned in my post about increasing lync security there is another option to enable two-factor authentication or application specific passwords for Lync, apart from passive authentication. For most of you who attended Lync conference 2014; you have most likely already heard of this option. Why do we need another option? Well, for some organizations this option might be a better fit. There are some limitations to the passive authentication solution that this option does not have; like the below examples.
Passive authentication is site wide
When Lync passive authentication is enabled, it is enabled site wide, more correctly it is set on the Lync web services level (Get-CsWebServiceConfiguration).
Exchange integration is not supported
The integration between Lync and Exchange is lost which in turn means that features are lost in the clients, for instance the meeting calendar.
Client support
Some clients does not support passive authentication such as the Mac client or several conferencing hardware products.
AD FS must be deployed and configured
While this isn’t a problem itself, it is quite a task to add to a Lync deployment if AD FS is not deployed already within the organization.
Enter the PointSharp authentication module. This is a third-party solution that integrates into the Front-End server’s IIS and takes over the authentication of the users. To get a bit more technical this solution protects the Webticket application externally and/or internally by presenting either a custom NTLM authentication or a SOAP based authentication. It uses the Windows APIs to create a Windows identity and then presents a valid user token to the Lync server.
While keeping the Lync sign-in experience intact it provides the option for an application specific password or a true two-factor authentication using tokens.
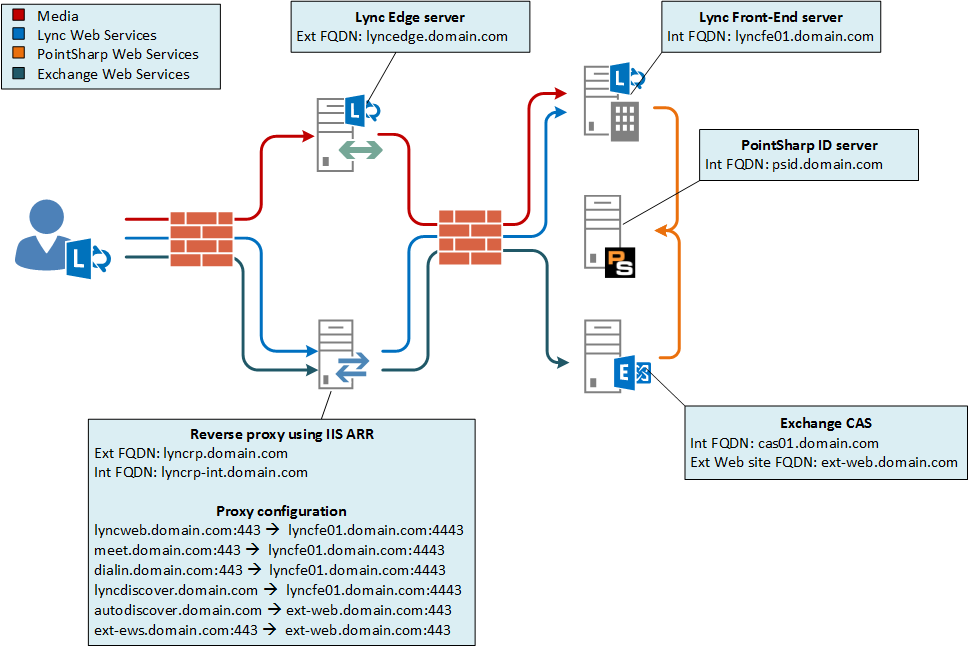
I was asked to do a demo with Lync and two-factor authentication without using domain passwords and in this case the passive authentication was not an option. There was also a requirement that only external clients have to use two-factor authentication. On top of this they also wanted to make use of the EWS integration. To get all this working I had to get a little creative. Let’s walk through it!
I’ll start with a network overview as I believe that will make my ramblings easier to understand. For those of you who read lync passive authentication with two-factor authentication will recognize the image with some small changes. Specifically that the AD FS server is gone and an Exchange server is added for Exchange web services integration.
First I had to install the authentication module on the Lync Font End server and configure it on the WebTicket web application on the Lync external web site. The configuration is done in the IIS management console and basically consists of pointing out the authentication server, to use NTLM and enable Lync support. Lync part done, on to the exchange integration.
Since the Lync client uses the credentials entered for both the access to Lync, Autodiscover and EWS all three had to accept the authentication being sent by the client (yes, I know there is an exchange credentials option but it isn’t very user friendly). I didn’t want to “disturb” any internal clients so I used the same approach as Lync does and created an external website on one of the CAS servers. I configured the bindings to be host based using a name that isn’t DNS resolvable on the LAN.
I then learned the hard way that creating new virtual directories for the autodiscover and EWS service by default points them to the same location as the original one, meaning that changes made on the external web application is also set on the original one. You don’t want to do this, trust me.
So instead I needed to create new virtual directories, completely separated from the original ones. I first copied some directories. C:\Program Files\Microsoft\Exchange Server\V15\FrontEnd\HttpProxy\ews -> C:\Program Files\Microsoft\Exchange Server\V15\FrontEnd\HttpProxy\ext-ews C:\Program Files\Microsoft\Exchange Server\V15\FrontEnd\HttpProxy\autodiscover -> C:\Program Files\Microsoft\Exchange Server\V15\FrontEnd\HttpProxy\ext-autodiscover
Then I created the virtual directories using the –Path switch. New-WebServicesVirtualDirectory –Server cas01.domain.com –Path “C:\Program Files\Microsoft\Exchange Server\V15\FrontEnd\HttpProxy\ext-ews” –ExternalUrl “https://ext-ews.domain.com/EWS/Exchange.asmx”
Then I installed the authentication module and used the same configuration both virtual directories as I did on the Lync server, except that I didn’t enable the Lync features.
When this was done I had to configure the ARR to handle requests for the EWS and autodiscover and proxy these request to this newly created external web site on the CAS. First and foremost I had to add ext-web.domain.com to the host file of the ARR and point it to the IP-address of cas01.domain.com.
Then I created two new server farms, one for autodiscover and one for the EWS.
I also needed the ARR to rewrite the host header to match the configured binding. This is done in the URL rewrite module.
First I had to add a server variable named HTTP_HOST. Then I edited the autodiscover rule to rewrite the header like in the image below.
After this I did the same host rewrite change to the EWS rule and I was all set! The demo went perfect and everyone who does demos knows how good it feels when everything is spot on.
Phew! long post, I guess i need one of these.
TL;DR I configured stuff, made Lync authentication more secure, demo went perfect.
For those of you who actually read all of it; thanks for your time, I hope you enjoyed it!
* Updated 2014-04-17 Added two-factor authentication explanation and updated the image showing the mobile sign in experience. Thanks to Shawn Harry (@shawnharry on twitter, you want to follow him) for pointing this out
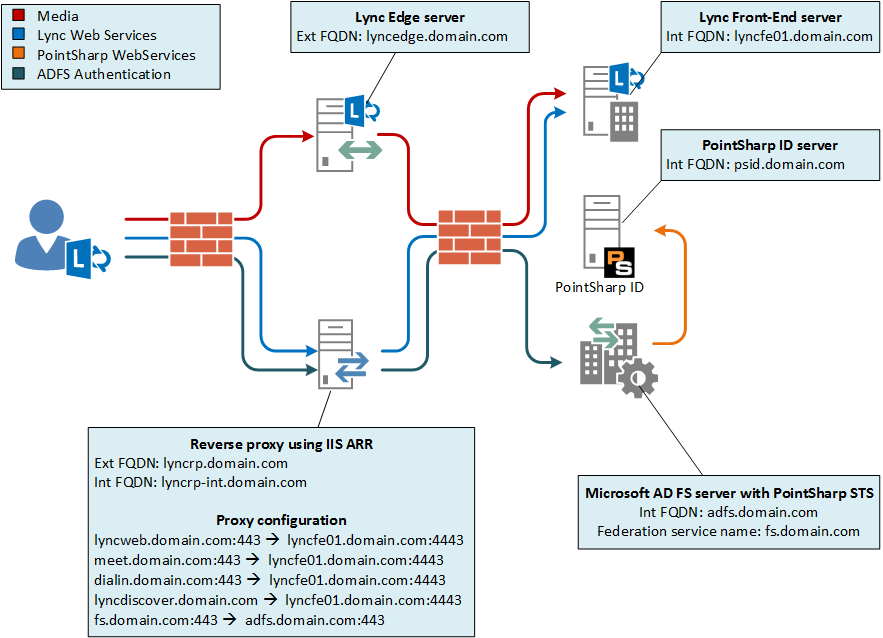
Welcome back to part II in this series about “Lync Passive Authentication with two-factor authentication”. In part I we looked at the configuration of passive authentication both on the Lync server and on the AD FS side. Today we’ll take a look at how to add two-factor authentication to this.
Lync passive authentication cannot do two-factor authentication by itself. It relies on AD FS to do the actual authentication. In turn AD FS requires a third-party authentication solution to bring two-factor authentication to the table. Let’s set the table!
First we need to set up a Security Token Service (STS) that can do the authentication and get the correct claims and pass them to the AD FS which in turn will send us to Lync with claims that is trusted by the Lync 2013 server. In this setup I’m using PointSharp Identity Federation which includes an STS which I have installed on the AD FS server. Please note that the actual STS configuration depends on the STS you use but it should be similar for many.
The configuration of this STS is done in the IIS Management console in a “snap-in” on the PointSharpSTS web application.
There’s a few settings you need to configure for this to work. In this case we need to tell the STS where the authentication server is, which authentication method to use, who the issuer of the claims is, the URI of the issuer, the relying party URL and a signing certificate that the AD FS trusts.
By looking at the above image and at the network topology image from part I of the series you will know what names should be put where. In my case the STS is installed on the AD FS server itself so the certificate used for signing the claims is the same as the AD FS uses.
We also need to configure the claims the STS should create and pass on to the AD FS. Lync 2013 wants the primarySID claim. In this case we tell the STS to collect the attribute values of userPrincipalName and objectSID from the authenticated user and send the values as claims to the AD FS.
The next step is to tell the AD FS that the STS is a trusted claims provider. The steps to do this differs a little between different STS’s. You can either use the <code>Add-AdfsClaimsProviderTrust cmdlet<code> in powershell or the AD FS management console. In my case the only thing I had to do was to point out the URL to the STS and give it a name (PointSharp ID in my setup for reference).
When the STS is added it will be listed as a claims provider. We now need to make a claim rule to pass the primarySid claim through. This can be done in the management console but the below example is for powershell.
1. Create a text file on your AD FS server using your favorite editor and paste the lines below into it. @RuleTemplate = "PassThroughClaims"
@RuleName = "Pass through primary SID"
c:[Type == "http://schemas.microsoft.com/ws/2008/06/identity/claims/primarysid"]
=> issue(claim = c);
2.Save the file as C:\ClaimsProviderRules.txt.
3. Start Windows PowerShell.
4. Attach the claim rule to the claims provider. Set-AdfsClaimsProviderTrust –TargetName "PointSharp ID" -AcceptanceTransformRulesFile "C:\ClaimsProviderRules.txt"
The final step is to force users who want to use Lync to use the STS that we just configured. This is done by modifying settings on the relying party which is the Lync server.
1. Start PowerShell on the AD FS server
2. Modify Lync relying party (note that “PontSharp ID” is the name of my claims provider in the AD FS console). Set-AdfsRelyingPartyTrust -Targetname Lync-Ext -ClaimsProviderName @("PointSharp ID")
Set-AdfsRelyingPartyTrust -Targetname Lync-Int -ClaimsProviderName @("PointSharp ID")
The table is now set and this is what it looks like when the dinner is served:
Lync mobile client:
1. Enter SIP-address.
2. Enter username and app-password (not domain password)
3. Enter a valid OTP (One-Time Password)
4. Logged in!
In the above example a hardware token was used to generate the OTP that provides the second factor in our two-factor authentication. As Shawn mentions in his comment, an SMS could also be used to provide the OTP.
Lync PC-client:
The sign in process is the same as on mobile clients, only the graphics differ.
I hope you have enjoyed this series about Lync passive authentication with two-factor authentication”. This part concludes the series but stay tuned for more Lync security.
Hello and welcome to this two part series about Lync passive authentication with two-factor authentication. Passive authentication is a feature of Lync server 2013 which, simply put, makes Lync AD FS claims aware. This in turn means that Lync 2013 server can be integrated with Microsoft AD FS for authentication purposes. In this post we will go through the configuration of Lync passive authentication as well as how to configure Microsoft AD FS to require two-factor authentication for Lync 2013.
So why do you want this? Well, you want to get better security for your Lync 2013 environment. For more information read my post about increasing Lync security.
Lync passive authentication requires support in the Lync client to handle the redirect to the AD FS login. This is something that has to be taken into consideration before deploying passive authentication. Refer to the list below for whether a specific client supports passive authentication as of 2014-02-20.
Now that we’ve considered supported clients, let’s get started. To set all of this up you need to have a few things ready. Call it prerequisites before you can complete the rest.
A working Lync 2013 standard or enterprise server.
A reverse proxy publishing the Lync installation to the internet.
This is a simple network overview which I believe will help during the configuration.
AD FS configuration
We’ll start by preparing the AD FS server by setting up the Lync server as a relying party and apply some rules to it.
1. Log in to adfs.domain.com with an account with AD FS administrative permissions.
2. Start PowerShell.
3. Add relying party trusts. Add-ADFSRelyingPartyTrust -Name Lync-Int -MetadataURL https://lyncfe01.domain.com/passiveauth/federationmetadata/2007-06/federationmetadata.xml
Add-ADFSRelyingPartyTrust -Name Lync-Ext -MetadataURL https://lyncweb.domain.com/passiveauth/federationmetadata/2007-06/federationmetadata.xml
That’s it, for now, on the AD FS server. We’ll come back to it later in part II.
Lync server 2013 configuration
Now we must configure the Lync to use passive authentication and to trust claims issued by our AD FS server (adfs.domain.com).
1. Log in to lyncfe01.domain.com as a user who is a Lync universal server administrator.
2. Start the Lync Server Management Shell.
3. Create a new Lync WebService Configuration. New-CsWebServiceConfiguration -Identity webserver:lyncfe01.domain.com -WsFedPassiveMetadataUri https://fs.domain.com/federationmetadata/2007-06/federationmetadata.xml
5. Change the mobility policy so it suits passive authentication Set-CsMobilityPolicy -Identity Global -AllowExchangeConnectivity $false
At this point Passive authentication is set up! In part II of the series we’ll configure the two-factor authentication and make it mandatory. Stay tuned for part II.
This is my first blog post about Lync, more will come but since most of them probably will be about authentication in one way or another this post seems like a good start.
I started to look into the Lync authentication process after getting a lot of questions from customers who wanted to know if and how they could increase the security of their planned Lync environment. Specifically how to handle mobile clients. However, before we go into how to make the Lync environment more secure we need to understand how authentication works.
Microsoft Lync Server 2013 supports A LOT of different clients, it is clearly one of its strengths. There’s a client for PCs, Macs, smartphone, tablets and IP-phones to name some of them. Depending on the type and version of the client being used you gain access to a different set of features from the plethora of Lync features. There is, however, one thing all these clients have in common. To enjoy the wonderful world of unified communications each and any of these clients have to tell the server who is connecting. Simply put, anyone connecting to a Lync server has to authenticate themselves. This is neither shocking nor surprising in any way but it is a very important part of any system using digital identities.
Diving into the authentication process I quickly realized that the authentication process differs depending on the client and its network location. Digging even deeper (thank you Wireshark), I started looking at the actual requests and responses that takes places during a Lync sign-in. Whatever authentication protocol the client uses there are a few steps that each client does before it reaches to the stage where it actually authenticates to the server.
1. Lync discover
This works similar to the Exchange autodiscover. It is used mainly to figure out if the client is an internal or external client and where to connect.
2. Metadata Exchange (MEX)
When the client knows where to connect it makes a connection the MEX service. The MEX service exposes metadata about the service, essentially it provides information about how the server is configured. It tells a client how and where it should do authentication.
3. Acquire a webticket
What each Lync client want is a webticket. The webticket is used throughout the whole Lync experience. It’s the master ticket, the one ticket to rule them all, the… You get it. To acquire this ticket the client connects to the webticket service which then prompts the user for authentication. This is where it starts to differ between the clients.
Lync 2013 supports many authentication protocols and this post will not discuss all of them but the following list shows the authentication protocol being used by some Lync clients in a default installation.
Client
Authentication protocol
PC-client (internal network)
Kerberos
PC-client (external network)
NTLM
Windows Phone
NTLM
iOS
NTLM
Android
NTLM (Versions prior to 5.4 use SOAP)
Lync Web App (domain user)
SOAP
Lync Web App (guest)
SOAP (Anonymous)
My next post about Lync will discuss what can be done to increase the security for Lync 2013.