
Hello and welcome to this two part series about Lync passive authentication with two-factor authentication. Passive authentication is a feature of Lync server 2013 which, simply put, makes Lync AD FS claims aware. This in turn means that Lync 2013 server can be integrated with Microsoft AD FS for authentication purposes. In this post we will go through the configuration of Lync passive authentication as well as how to configure Microsoft AD FS to require two-factor authentication for Lync 2013.
So why do you want this? Well, you want to get better security for your Lync 2013 environment. For more information read my post about increasing Lync security.
Lync passive authentication requires support in the Lync client to handle the redirect to the AD FS login. This is something that has to be taken into consideration before deploying passive authentication. Refer to the list below for whether a specific client supports passive authentication as of 2014-02-20.

Now that we’ve considered supported clients, let’s get started. To set all of this up you need to have a few things ready. Call it prerequisites before you can complete the rest.
- A working Lync 2013 standard or enterprise server.
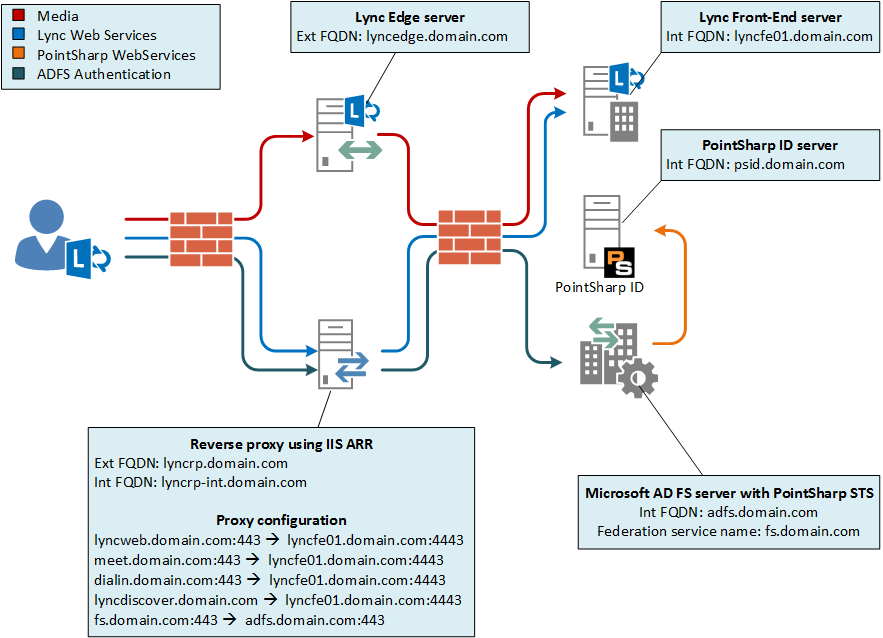
- A reverse proxy publishing the Lync installation to the internet.
- Microsoft AD FS installed configured.
In this environment I’m using the IIS Application Request Routing (ARR) as a reverse proxy. If you plan on using the ARR, I recommend this guide: Using IIS ARR as a Reverse Proxy for Lync Server 2013.
This is a simple network overview which I believe will help during the configuration.
AD FS configuration
We’ll start by preparing the AD FS server by setting up the Lync server as a relying party and apply some rules to it.
1. Log in to adfs.domain.com with an account with AD FS administrative permissions.
2. Start PowerShell.
3. Add relying party trusts.
Add-ADFSRelyingPartyTrust -Name Lync-Int -MetadataURL https://lyncfe01.domain.com/passiveauth/federationmetadata/2007-06/federationmetadata.xml

Add-ADFSRelyingPartyTrust -Name Lync-Ext -MetadataURL https://lyncweb.domain.com/passiveauth/federationmetadata/2007-06/federationmetadata.xml
4. Create authorization and transform rules.
$IAR = '@RuleTemplate = "AllowAllAuthzRule" => issue(Type = "http://schemas.microsoft.com/authorization/claims/permit", Value = "true");'
$ITR = '@RuleTemplate = "PassThroughClaims" @RuleName = "primarySid" c:[Type == "http://schemas.microsoft.com/ws/2008/06/identity/claims/primarysid"]=> issue(claim = c);'
5. Configure relying party trusts
Set-ADFSRelyingPartyTrust -TargetName Lync-Int -IssuanceAuthorizationRules $IAR
Set-ADFSRelyingPartyTrust -TargetName Lync-Int -IssuanceTransformRules $ITR
Set-ADFSRelyingPartyTrust -TargetName Lync-Ext -IssuanceAuthorizationRules $IAR
Set-ADFSRelyingPartyTrust -TargetName Lync-Ext -IssuanceTransformRules $ITR
That’s it, for now, on the AD FS server. We’ll come back to it later in part II.
Lync server 2013 configuration
Now we must configure the Lync to use passive authentication and to trust claims issued by our AD FS server (adfs.domain.com).
1. Log in to lyncfe01.domain.com as a user who is a Lync universal server administrator.
2. Start the Lync Server Management Shell.
3. Create a new Lync WebService Configuration.
New-CsWebServiceConfiguration -Identity webserver:lyncfe01.domain.com -WsFedPassiveMetadataUri https://fs.domain.com/federationmetadata/2007-06/federationmetadata.xml
4. Disable default authentication mechanisms.
Set-CsWebServiceConfiguration -Identity webserver:lyncfe01.domain.com -UseWsFedPassiveAuth $true -UseWindowsAuth none –UseCertificateAuth $true
New-CsProxyConfiguration -Identity registrar:lyncfe01.domain.com -UseKerberosForClientToProxyAuth $false -UseNtlmForClientToProxyAuth $false
5. Change the mobility policy so it suits passive authentication
Set-CsMobilityPolicy -Identity Global -AllowExchangeConnectivity $false
At this point Passive authentication is set up! In part II of the series we’ll configure the two-factor authentication and make it mandatory. Stay tuned for part II.
